How to Create VestaCP Webserver in AWS
One of simple application we can build in AWS is webserver. Using single EC2 we will have reliable webserver. And yes, build webserver in VPS vendor such as Linode and Digital Ocean is much cheaper and easier than you create in public cloud like AWS and GCP. But if you build webserver using AWS you have some advantage. When your webserver need much more feature you can utilize many services in AWS seamlessly.
If you don’t have any experience with AWS, please try it. It’s awesome. AWS offer 12 month free tier service. With free tier you can try 750 hours per month some of the EC2 instance type.
To build webserver, you also need to buy domain. Don’t want to buy domain? Please try free domain, freenom.com is one of the best.
If you have already subscribe AWS and had a domain, you can continue to next step.
Launch instance in AWS is simple, just follow this link https://docs.aws.amazon.com/quickstarts/latest/vmlaunch/step-1-launch-instance.html. To ease the next step choose Ubuntu or CentOS. During configure security group please add port 8083 for vestacp service. In my experience using Amazon Linux need additional setup during install VestaCP. Please keep key pair and IP address of your instance.
If you using Ubuntu type following command to login to your instance via linux command line : “sudo ssh <keypair.pem> ubuntu@ec2-<IP Address>.<region>.compute.amazonaws.com. IP Address using dash (-) instead of dot (.). Lets say your setup are following:
- key pair = key.pm
- IP Address = 54.255.150.94
- Region = ap-southeast-1
Your login command will be sudo ssh -i “key.pem” ubuntu@ec2–54–255–150–94.ap-southeast-1.compute.amazonaws.com
Once you succeed to login type following command accordingly to install vesta cp
- sudo apt update
- curl -O http://vestacp.com/pub/vst-install.sh
- bash vst-install.sh
During vestacp installation if any request to insert FQDN please type domain you already have. Once installation completed, you will get login information to your fresh VestaCP like following:

Just keep those following information.
To make sure your vestacp work, using browser type https://<IP Address>:8083 and you will see like this

Next step is pointing your domain to AWS EC2. AWS has Route 53 to manage and maintain Domain Name System. It’s highly available and scalabe — that what they said. You don’t have to buy your domain in AWS, you can use domain you aleady have.
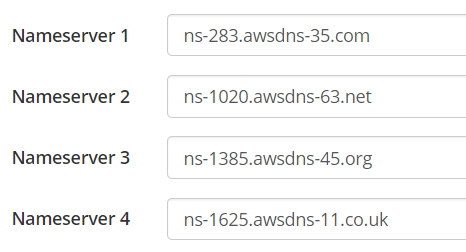
Go to https://console.aws.amazon.com/route53 and create new Hosted Zone. You will get deafult value for your domain like capture below

If you buy domain not on AWS go to your domain manager and add NS information to your domain. The values is exactly like aws provide

Next we need to add additional value to Route 53 and vesta CP. Please follow the steps below
- Add ns1 and ns2 value in Route 53

- Add ns value to vestacp


Don’t forget to change ns setup in user menu

Once you finish, please wait until the domain propagate. And then you can type your domain and if you see like following, your webserver work properly with your domain.

Have a nice try. If you want to discuss with me, just email me nasir@nasir.id
